一篇文章从无到有详解Spring中的AOP,久久派带你了解更多相关信息。
前言
AOP (Aspect Orient Programming),直译过来就是 面向切面编程。AOP 是一种编程思想,是面向对象编程(OOP)的一种补充。面向对象编程将程序抽象成各个层次的对象,而面向切面编程是将程序抽象成各个切面。
从《Spring实战(第4版)》图书中扒了一张图:
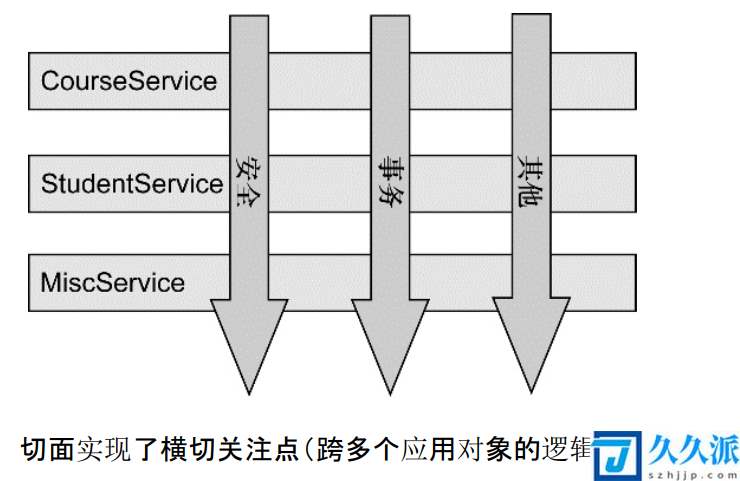

从该图可以很形象地看出,所谓切面,相当于应用对象间的横切点,我们可以将其单独抽象为单独的模块。
<?xml version=\"1.0\" encoding=\"UTF-8\"?><beans xmlns=\"http://www.springframework.org/schema/beans\" xmlns:xsi=\"http://www.w3.org/2001/XMLSchema-instance\" xmlns:aop=\"http://www.springframework.org/schema/aop\" xsi:schemaLocation=\"http://www.springframework.org/schema/beans https://www.springframework.org/schema/beans/spring-beans.xsd http://www.springframework.org/schema/aop https://www.springframework.org/schema/aop/spring-aop.xsd\"> <!-- 配置Service --> <bean id=\"accountService\" class=\"com.itheima.service.impl.AccountServiceImpl\"> <!-- 注入dao --> <property name=\"accountDao\" ref=\"accountDao\"></property> </bean> <!-- 通知方法 --> <!-- 配置事务管理器--> <bean id=\"txManager\" class=\"com.itheima.utils.TransactionManager\"> <!-- 注入ConnectionUtils --> <property name=\"connectionUtils\" ref=\"connectionUtils\"></property> </bean> <!-- 切面 --> <aop:config> <aop:pointcut id=\"pc\" expression=\"execution(* com.itheima.service.impl.*.*(..))\"/> <aop:aspect ref=\"txManager\"> <aop:before method=\"beginTransaction\" pointcut-ref=\"pc\"/> <aop:after-returning method=\"commit\" pointcut-ref=\"pc\"/> <aop:after-throwing method=\"rollback\" pointcut-ref=\"pc\"/> <aop:after method=\"release\" pointcut-ref=\"pc\"/> </aop:aspect> </aop:config>
AOP(Aspect Oriented Programming)
面向切面编程。横向重复,纵向抽取。
简单的说它就是把我们程序重复的代码抽取出来,在需要执行的时候,使用动态代理的技术,在不修改源码的基础上,对我们的已有方法进行增强。
实现原理:动态代理
事务处理方式
动态代理之前
在我们原始的控制事务中,
ConnectionUtils类:控制单线程内只使用一个数据库连接(connection)—>TransactionManager类 ,书写方法:
1) 打开手动提交事务conn.setAutoCommit(false);
2) 提交事务conn.commit();
3) 回滚事务conn.rollback();
4) 释放当前数据库连接(手写)。—>在业务层中,
try{ 1) 业务方法 2)}catch(Throws t){ 3) } finally{ 4)}
在每个需要事务控制的方法都像这样加上事务控制。
这样书写的业务层的代码,过于臃肿,重复代码过多。
动态代理实现
事先写一个生成创建Service的代理对象的工厂类
/** * 用于创建Service的代理对象的工厂 */public class BeanFactory { private IAccountService accountService; private TransactionManager txManager; public void setTxManager(TransactionManager txManager) { this.txManager = txManager; } public final void setAccountService(IAccountService accountService) { this.accountService = accountService; } /** * 获取Service代理对象 * @return */ public IAccountService getAccountService() { return (IAccountService)Proxy.newProxyInstance(accountService.getClass().getClassLoader(), accountService.getClass().getInterfaces(), new InvocationHandler() { /** * 添加事务的支持 * * @param proxy * @param method * @param args * @return * @throws Throwable */ @Override public Object invoke(Object proxy, Method method, Object[] args) throws Throwable { Object rtValue = null; try { //1.开启事务 txManager.beginTransaction(); //2.执行操作 rtValue = method.invoke(accountService, args); //3.提交事务 txManager.commit(); //4.返回结果 return rtValue; } catch (Exception e) { //5.回滚操作 txManager.rollback(); throw new RuntimeException(e); } finally { //6.释放连接 txManager.release(); } } }); }
BeanFactory 使用动态代理返回一个 IAccountService 对象并调用相应方法。
把这个创建的对象存入Spring容器中,并注入原来的 accountService 和 txManager(事务管理工具类);
<!--配置beanfactory--><bean id=\"beanFactory\" class=\"com.itheima.factory.BeanFactory\"> <!-- 注入service --> <property name=\"accountService\" ref=\"accountService\"></property> <!-- 注入事务管理器 --> <property name=\"txManager\" ref=\"txManager\"></property></bean>把动态代理创建的 IAccountService ,也存入到 Spring 容器中。<!--配置代理的service--><bean id=\"proxyAccountService\" factory-bean=\"beanFactory\" factory-method=\"getAccountService\"></bean>
把动态代理创建的 IAccountService ,也存入到 Spring 容器中。
<!--配置代理的service--><bean id=\"proxyAccountService\" factory-bean=\"beanFactory\" factory-method=\"getAccountService\"></bean>
测试方法:
/** * 使用Junit单元测试:测试我们的配置 */ @RunWith(SpringJUnit4ClassRunner.class) @ContextConfiguration(locations = \"classpath:bean.xml\") public class AccountServiceTest { @Autowired @Qualifier(\"proxyAccountService\") private IAccountService as; @Test public void testTransfer(){ as.transfer(\"aaa\",\"bbb\",100f); }}
在做业务层的事务控制时,可直接调用工厂类创建出的代理对象,实现事务控制,从而也使程序员在写业务层时只管写业务,而不用管事务代码。
当然我们能想到这样的办法,spring也早就封装好了,在书写xml配置文件时更加简洁,可观。
AOP的使用
通过配置的方式实现上述功能,不用再自己书写工厂类。
AOP的相关术语
- Joinpoint(连接点):
所谓连接点是指那些被拦截到的点。在spring中,这些点指的是方法,因为spring只支持方法类型的连接点。 - Pointcut(切入点):
所谓切入点是指我们要对哪些Joinpoint进行拦截的定义 - Advice(通知/增强):
所谓通知是指拦截到Joinpoint之后所要做的事情就是通知。
通知的类型:前置通知,后置通知,异常通知,最终通知,环绕通知。 - Introduction(引介):
引介是一种特殊的通知在不修改类代码的前提下, Introduction可以在运行期为类动态地添加一些方法或Field。 - Target(目标对象):
代理的目标对象。 - Weaving(织入):
是指把增强应用到目标对象来创建新的代理对象的过程。
spring采用动态代理织入,而AspectJ采用编译期织入和类装载期织入。 - Proxy(代理):
一个类被AOP织入增强后,就产生一个结果代理类。 - Aspect(切面):
是切入点和通知(引介)的结合。
学习Spring中的AOP要明确的事
a、开发阶段(我们做的)
编写核心业务代码(开发主线):大部分程序员来做,要求熟悉业务需求。
把公用代码抽取出来,制作成通知。(开发阶段最后再做):AOP编程人员来做。
在配置文件中,声明切入点与通知间的关系,即切面。:AOP编程人员来做。
b、运行阶段(Spring框架完成的)
Spring框架监控切入点方法的执行。一旦监控到切入点方法被运行,使用代理机制,动态创建目标对象的代理对象,根据通知类别,在代理对象的对应位置,将通知对应的功能织入,完成完整的代码逻辑运行。
步骤
1、导包
2、书写spring配置文件
<?xml version=\"1.0\" encoding=\"UTF-8\"?><beans xmlns=\"http://www.springframework.org/schema/beans\" xmlns:xsi=\"http://www.w3.org/2001/XMLSchema-instance\" xmlns:aop=\"http://www.springframework.org/schema/aop\" xsi:schemaLocation=\"http://www.springframework.org/schema/beans https://www.springframework.org/schema/beans/spring-beans.xsd http://www.springframework.org/schema/aop https://www.springframework.org/schema/aop/spring-aop.xsd\"> <!-- 配置Service --> <bean id=\"accountService\" class=\"com.itheima.service.impl.AccountServiceImpl\"> <!-- 注入dao --> <property name=\"accountDao\" ref=\"accountDao\"></property> </bean> <!-- 通知方法 --> <!-- 配置事务管理器--> <bean id=\"txManager\" class=\"com.itheima.utils.TransactionManager\"> <!-- 注入ConnectionUtils --> <property name=\"connectionUtils\" ref=\"connectionUtils\"></property> </bean> <!-- 切面 --> <aop:config> <aop:pointcut id=\"pc\" expression=\"execution(* com.itheima.service.impl.*.*(..))\"/> <aop:aspect ref=\"txManager\"> <aop:before method=\"beginTransaction\" pointcut-ref=\"pc\"/> <aop:after-returning method=\"commit\" pointcut-ref=\"pc\"/> <aop:after-throwing method=\"rollback\" pointcut-ref=\"pc\"/> <aop:after method=\"release\" pointcut-ref=\"pc\"/> </aop:aspect> </aop:config>
3.业务层代码
public void transfer(String sourceName, String targetName, Float money) { System.out.println(\"transfer....\"); //2.1根据名称查询转出账户 Account source = accountDao.findAccountByName(sourceName); //2.2根据名称查询转入账户 Account target = accountDao.findAccountByName(targetName); //2.3转出账户减钱 source.setMoney(source.getMoney()-money); //2.4转入账户加钱 target.setMoney(target.getMoney()+money); //2.5更新转出账户 accountDao.updateAccount(source);// int i=1/0; //2.6更新转入账户 accountDao.updateAccount(target); }
4.测试
@RunWith(SpringJUnit4ClassRunner.class)@ContextConfiguration(locations = \"classpath:bean.xml\")public class AccountServiceTest { @Autowired @Qualifier(\"accountService\") private IAccountService as; @Test public void testTransfer(){ as.transfer(\"aaa\",\"bbb\",100f); }}
使用spring的AOP基于动态代理开发,简洁的实现了该对象方法的增强,也就是实现了对转账的事务控制。
/*** 使用Junit单元测试:测试我们的配置*/ @RunWith(SpringJUnit4ClassRunner.class) @ContextConfiguration(locations = \"classpath:bean.xml\") public class AccountServiceTest { @Autowired @Qualifier(\"proxyAccountService\") private IAccountService as; @Test public void testTransfer(){ as.transfer(\"aaa\",\"bbb\",100f); }}
总结
到此这篇关于详解Spring中AOP的文章就介绍到这了,更多相关详解Spring中AOP内容请搜索趣讯吧以前的文章或继续浏览下面的相关文章希望大家以后多多支持趣讯吧!
版权声明:本文内容由互联网用户自发贡献,该文观点仅代表作者本人。本站仅提供信息存储空间服务,不拥有所有权,不承担相关法律责任。如发现本站有涉嫌抄袭侵权/违法违规的内容,请发送邮件至 55@qq.com 举报,一经查实,本站将立刻删除。转转请注明出处:https://www.szhjjp.com/n/17261.html